Hamilton is a WordPress theme that is built for creatives, this gorgeous theme is perfect for image-heavy blogs. It is simple and clean yet still allows for some customization. Don’t worry the customization options are simple so it is easy to use and hard to mess up! This theme relies on creating posts, which means that the most recently added items will show up at the top of the homepage, unless you make them sticky. You can still have static pages (see About Me), but they won’t be posted on the homepage.
The customizer allows you to change from dark text on a light background to white text on a dark background. It also allows you to set a custom background (remember to keep accessibility in mind), replace the Primary menu with a toggle, change from the two column grid to a three column grid and a title to the front page when it is set to display your latest posts. To get to the Customizer, ensure you are logged in then click the Customize link that is located in the menu bar at the top of your screen.

The menu shown below will appear on the left hand side of your screen.
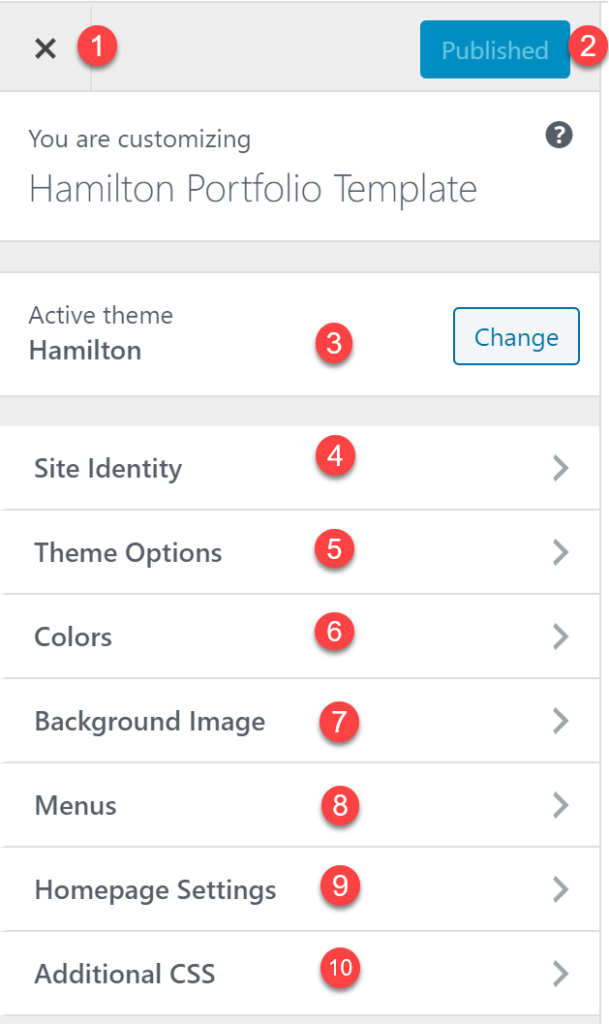
- (X) Closes the menu
- Once you make a change this button will change to Publish make sure you click Publish to save your changes.
- Click Change to test out different themes, you can always change back!
- Here you can update the site’s title and tagline (which does not display by default).
- Here you can change the primary menu to a toggle, set the home page to display as three columns instead of two, and show preview titles.
- Click here to change the site’s background colors or to go to dark mode!
- This is pretty intuitive, here you can set a background image for the site.
- This is another place where you can update the sites menus, WordPress loves choice!
- Click Homepage Settings to switch to a static home page rather than your latest posts.
- If you are a savvy css writer click here to customize your site!
Note, to get back to the main page of this menu after clicking a menu item click the left pointing arrow that appears below #1 (the X).
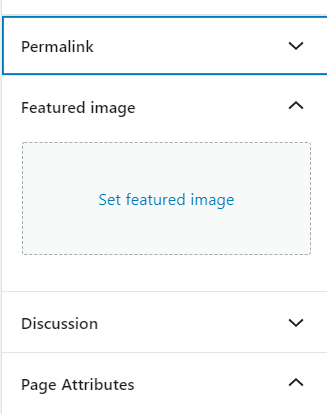
Adding a feature image
When editing a page, ensure “Document” is highlighted in the right hand menu. Click on “feature image” and click on “set feature image” to upload or select an image. Don’t forget to click “Update”to save your changes!
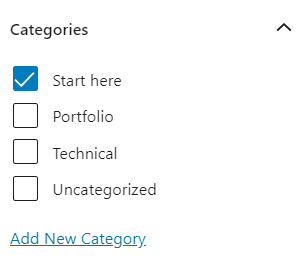
Categorizing your posts
Creating categories is a great way to organize and group your posts. To select or create a new category, go to the document editor on the right and scroll down to the Categories section. After you have made your edits, click the blue “Update” button.
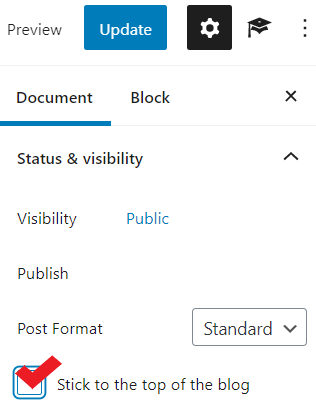
How to make posts sticky
Making a post sticky means that it will stay at the top of your page. To do this, start by editing this post, then make sure to select the “Document” editor on the right. Check the box that says “Stick to the top of the blog.” Don’t forget to click the blue “Update” button to save.
Turning comments on
If you would like to allow viewers to make comments on any of your posts, in your dashboard, go to “Posts.” Select the post(s) that you would like comments on and click “Quick Edit.” In Quick Edit, check the box that says “Allow Comments.” Lastly, click the blue “Update” button to save your changes.

We recommend you delete this text and add your own. If you want to keep a version of this, you can clone it and then save the duplicate as a draft.
Template by Jamie Drozda and Melanie Laurie #UBCMET